Developer Info
Suggested Pre-Event Timeline
Be sure to attend the Volunteer Bootcamp and Kickoff Sessions.
-
T-2 weeks – Lead developer, UX, BA, and Tech Jedi shall meet virtually to review requirements, scope and potential technologies to finalization on technology choice and agreement of attainable scope. This gives them a chance to ask questions and guide the PM on how to best support you during the actual weekend.
-
T-1 week – All team members required. Call to review scope, technology, and ask for individual ownership of tasks. PM should set up tracking & communication tools, if applicable. Lead Dev and PM should coordinate set up of production environments with Tech Jedi. Identify your skills needed and start reviewing technology to be used. If you are missing something, ask your PM or Tech Jedi for help. Most importantly, detail what needs to be accomplished in a User Story format to drive to clarity of goal and expectation.
-
T-1 day – Team touch base to ensure everybody is ready for Friday night. Communicate any last-minute updates from the charity.
Getting Yourself Ready
The first step to starting a successful GiveCamp weekend is getting yourself prepared. It is a valuable service you are providing, and it falls on you to make sure all the donated time and resources are used in the most efficient way possible, in the limited time you have access to them.
It is hard work you can accomplish and can be very rewarding.
Start by getting yourself prepared. The charities have already done a lot of work getting their submissions ready. The GiveCamp staff has spent a lot of time and effort refining the tools and resources we must make you successful. Spend time reviewing all artifacts BEFORE reaching out with questions or concerns to save time and effort.
STOP: Before reading any further, get your Charities Long Form Application out and review it.
As you read, pay careful attention to what is to be accomplished, and what is being asked for. This will form the basis for your planning and help ensure you can deliver exactly what the charity needs, so they can do more for the community.
Tips on preparing for GiveCamp
- Review your Charity’s information be familiar with their mission, and what they are expecting to get at the end of GiveCamp.
- Review your Charities long form, and be familiar with their mission, and what they are specifically expecting to get at the end of GiveCamp. NOTE: Be aware that as the PM and team work with the charity requirements might change from what was originally requested in the long form application
- Help your PM get all tasks laid out, as much as you can get set up do beforehand. If you don’t, you could waste a day on it. Your PM should start planning 4 weeks prior to event. Key is to plan; the pace is fast.
- Identify what features/user stories/behaviors are being requested. Try to ensure that clearly defined user roles and acceptance criteria/requirements are defined. Consider reviewing or creating “cheap” mockups to better communicate the need/want and potential implementation.
- If you are new to the technology you are being asked to use, research online as much as you can beforehand, and try to find someone at GiveCamp that has experience.
- Do a dry run of as much stuff as possible beforehand. If you are using a database, get the database up and running early. If you are using a third-party product, like WordPress, make sure you have all the required install media and any plug-ins or patches, etc. Consider free trials to learning sites like PluralSight to get up to speed.
- Try to honestly identify what you can accomplish from the list of prioritized needs that fit your skill set, so the PM can better estimate and communicate what most likely will be accomplished.
- Identify potential technology needs. Identify dependencies and try to resolve them. Know where source control may be, locations/URLs of artifacts, logins, etc. If possible, test out your tools or processes.
- Try to login to any systems needed before GiveCamp to ensure access.
- Pull anything needed local beforehand so that bandwidth is not an issue during GiveCamp.
- Get to know your team and make sure the team knows you. Understanding everyone’s personality, communication protocols, and experience will help you work together in a small area under high pressure. Consider how your actions or words may affect others beforehand. For example, turning music up and talking on speaker phone may drive your teammates crazy. Try to keep your area clean as well. Leaving trash around can build up and become a drag. Be a leader and support your teammates.
- Understand what roles each team mate is fulfilling for the project. Your team’s PM will be one of the most important.
- Identify and communicate your travel time to your team. Share phone numbers with teammates in case an emergency occurs and GiveCamp is closer to you than another support. Try not to drive on little sleep or car pool if possible. Let your team know if you will be out during GiveCamp and for how long in order for the team to plan.
- If you have concerns about the scope, or design- communicate concerns to your team to get those resolved before the weekend.
- Work as a TEAM!!
Working with the Charity
You want a chance to be a hero in real life.
Well this is it.
You are about to achieve something your charity can only dream of. They may make amazing things happen in your community and do things with their life that you would never be able to make the sacrifice to do. You are going to be performing a potentially course altering project that will impact the trajectory of their story from this point forward. That is awesome.
To work with them effectively there are two things you will need to focus on.
- The Relationship. Don’t sell this short. Make sure you get to know them and their mission. They are passionate about it, and you should make sure you develop some real passion about it as well. Someone you know may come to depend upon their services soon. Take time with them and make sure you understand what they need and want.
- The Scope. This is always the biggest challenge. Keeping the scope manageable and communicating that clearly. They won’t know what is possible, and what they see as valuable often will not have a direct correlation to what is hard or easy. They may get a lot of value out of a simple change and may only get a small bump from something that is very hard to do. But remember this: Disappointment isn’t possible without first having incorrect expectations. Whatever scope you commit to delivering, make sure your charity has the correct expectations all the way along. Don’t over commit, we only have 1 weekend.
Work with your assigned Project manager:
- Meet with Project Manager prior to GiveCamp: gather requirements and have a clear understanding of the plan prior to GiveCamp weekend. Define as much website content as possible.
- Work with the PMs to identify the scope you know you can deliver. Make sure the focus is on the “must have” before the “optional” items are addressed.
- Know when and how long they will be onsite during the weekend.
- Utilize the PM assigned to your project to communicate to the charity rep in case you have an urgent need for information or clarification.
- If possible, attend team meetings prior to GiveCamp. The PMs will schedule. Let them know your availability.
Working with your Team
Your time donation and being away from friends and family to complete strangers for a good cause is more than awesome. You are greatly appreciated
- Manage the tasks assigned to you. If you have a dependency on a task being worked on by another team member, communicate your timeline. Make sure you have a clear understanding of what is being delivered and the technology being used. The timeline for GiveCamp is very compressed, and if you are pulling late nights’ energy can wane and emotions flare up.
- Your PM can clear up questions and clear roadblocks. Invariably there will be questions, debates, and issues with technology. Be sure to rely on your PM for this, so you can remain heads down on your work and having enough time is critical.
Working the Weekend
Showtime. The GiveCamp weekend is where all your hard work and preparation will pay off. It will seem crazy at times, and when you explain it to people they may not get it. But it will be a memorable weekend and if done right will move the world towards being a better place. Some important things to keep in mind: The schedule. That is really it. Make sure you are on target, and if you are not, let somebody know right away. You must make things happen fast if anything starts trending the wrong way.
- Be ready to hit the ground running, build databases, install WordPress, and make sure IIS is working.
- Know when food is going to be served and plan out tasks and breaks accordingly.
- Have regularly planned status updates, this will vary by team, but if you sense a lull, have a team huddle.
- Start deploying code as soon as possible.
- Test and deliver as you go, work with your team on how that will work.
- Try to have all the code done before the end of Saturday.
-
Use Sunday for fighting bugs, moving content, tweaking the UI, training the charity, and getting the summary deck ready.
But above all STAY ON SCHEDULE and prioritize what adds the most value to the charity.
Outline of developer responsibilities at GiveCamp
- Do what is best for the charity
- Ensuring the charity has a site they can maintain and keep running are key
- Due to time constraints a minimal viable product is appropriate with technology at hand
- Reuse well known, tested libraries and frameworks as much as possible
- Technology that is used during GiveCamp weekend needs to be simple enough for the charities to admin after GiveCamp weekend.
- Keep it simple - No resume building work!
- Watch what you use - Be careful not to violate any copyrights
- Test all the tools before the weekend
- Attend pre-meetings as your schedule allows. If you miss any, please reach out to your team lead for an update.
- Commit! - Your team and assigned charity is relying on you
- Complete your assigned tasks - Help others!
Tech Jedi
- Each team will be assigned a Tech Jedi
- This resource has years’ worth of experience in technology and GiveCamp. They are here to help you with technical issues, for any escalations that you, the developer, may have.
- If your assigned Jedi is not readily available, let your organizer know.
Manage the following during the actual weekend
- Participate in your team’s progress checks
- Tasks- White Board, post-its, Trello; pre-defined for the most part based on prep
- Work with your PM & Charity rep when you have questions about what a requirement is asking or if your implementation meets the requirement.
- Risk management- use something you are familiar with and comfortable with. Track on whiteboards, or post-its
- Timeframe- Stick to a defined scope and understood what can’t be accomplished. Think Minimal viable product, then enhance. Be on the lookout for other solutions that could implement most of the requirement but be easier to build/maintain. For example, your charity might ask for something and a WordPress plugin might already exist that most of what they are asking for. However, to give them the 100% solution you would need to write a bunch of code. The existing plugin might be a better route because it is better documented and supported longer term then custom code you would write.
- Testing- Developers and Charity rep should test as work is completed
- Communications- deliver clear expectations
- Escalations- Reach out to GiveCamp Organizers & Tech Jedi’s as needed. Don’t waste a lot of time spinning your wheels.
- Coordination- huddle and use whiteboard
- Delivery- Don’t wait to Sunday afternoon to do one big bang push. You don’t want to find out Sunday afternoon that you are missing something and cannot deploy.
Common challenges and how to prepare for them
- Bandwidth- Wi-Fi gets overloaded and can’t handle workload from the teams. First day- everyone syncing and loading. At the end- also everyone is trying to copy web pages. Plan ahead.
- Keep it simple – Remember that the charity is going to need to own this project starting Monday and you have a very limited time and resources to get the project done. Do you best to keep the developers focused on the “minimal viable product” before starting any “cool ideas” or nice to haves.
Tips and Tricks for working with your team
- Expect struggles and challenges from yourself, technology and teammates. It’s easier to deal with issues when you know they are sure to come.
- Take breaks when you need to stay focused on delivery. Try to plan your breaks if possible and know when lunch and dinner occurs.
- Time box your work to help achieve each step toward the goal.
- If possible, look at doing a very simple task that involves as many layers/levels to ensure the process of delivering is established. Do not try to build something large and push through. Small and simple will lay the foundation for large and complex.
- If you have a dependency on a task being worked on by another team member, communicate your timeline.
- If you are asked to track progress, understand the tool and when to update. It would better to over communicate given the short amount of time. The sooner an issue is brought to the table the sooner it can be resolved.
- Use your team’s expertise and experience if you hit a road block. Your PM can clear up questions and clear roadblocks. Invariably there will be questions, debates, and issues with technology. Be sure to rely on your PM for this, so you can remain heads down on your work and having enough time is critical.
Working with the Technology
Obviously, the success or failure of your weekend will depend largely on you and your team’s ability to get the technology the charity needs, acquired, deployed, configured, and populated with correct content. Many GiveCamp projects involve some level of data migration or content remastering. Rarely do they come to GiveCamp with NO website or email.
We will use a few technologies’ during the weekend. The project manager will have all needed codes for the tech leads to set up prior to the weekend.
- Prior to the weekend GiveCamp Tech Jedi can install production for any team that needs Everleap & Wordpress. We highly recommend this and your PM can request this if desired.
- If you do receive an install code, please keep in mind this is only for charity use only.
- If your team is using Everleap please include - Everleap verbiage “Hosting donated by Everleap”, with a link back to Everleap.com.
- Please put in the site footer “Site Created by the volunteers of Dallas GiveCamp”, with a link back to DallasGiveCamp.org.
Tips and Tricks for working with technology
- Technology is much easier to deal with when you have a small, clearly defined objective. Make sure you have a plan then work your tasks. Defining user stories and acceptance criteria beforehand will help you deliver more successfully.
- Take backups if possible of any and all systems your team may change.
- Make sure you can access everything you need to. Murphy (aka Murphy’s Law) will be waiting for you especially when you are low on patience.
- Try to build and deploy, if applicable, without changes to ensure your DevOps/delivery process is in order before adding changes.
- Small chunks of work are easier to deal with than large chunks of work. Test and deploy often to ensure quality and give more time to productivity than fixing.
- Try to stay loosely coupled especially for web links or configurations that may change if the system is deployed somewhere else.
- Don’t feel like it must be perfect. You may want to have separation of concerns, but given the amount of time to deliver, you may put business rules in the UI, etc. Delivering the feature technically “dirty” may be good enough. Of course, always strive to do what is right for the charity. A working solution is valued over an awesome solution that never is finished.
Lesson learned from past GiveCamps
- Use Relative URLs for links to images, documents and pages, as this will ensure that nothing is lost when the DNS transfer happens
- Make sure Website available and domain temp-name set up. Complete DNS transfer after the charity has approved the new website. Be VERY careful when making DNS changes as they could impact other services registered to the charities domain, like email. When in doubt ask for assistance from the Tech Jedis if you have any questions.
- Group requirements by the section (page) of the website that they belong on, this will make it easier to divide the work between the team members. Notify event staff if you feel your team is understaffed
- Upfront training is available on the technology being used.
Tech Details
Most of the charities need help with Content Management Systems (aka website they can manage without being a developer) to provide online information to the world about them. Some charities are moving to CRM, and fewer have deeper custom development or other needs. Remember to make sure; if possible, you back up existing work before making changes.
Content Management System (CMS)
Most charities requirements are for a basic brochure type website (home, about us, contact us, etc.). Additionally, one of our main goals of GiveCamp is to leave the charity with something they can maintain without the help of a developer. To that end in many cases we want to implement a CMS for them. There are many CMS’s available; however, we strongly recommend using WordPress, unless the charity has a specific reason not to. We recommend this because WordPress has thousands of plugins, themes, etc. available that will greatly speed your development time. WordPress also provides an easy to use web interface so that the charity can maintain the site on an ongoing basis.
- WordPress is very easy to use. If you have a plan and clear goal, implementation should be much easier.
- WordPress will demand an admin type user to be able to update themes, add plugins, set configurations, etc. The WordPress website has editing tools built into the browser, so other development tools are not necessary. Deployments can be as simple as clicking a button to change the content online without a deployment process.
- There are many plugins for WordPress that most likely cover the same pattern of need by your charity. You may need to review the features needed and make a list of plugins available with tradeoffs to review with the team, PM, and/or charity.
- Depending on your theme choice, and the content you put in it, WordPress can produce a very nice mobile ready website as well as a website that works well on a full browser
- Consider documenting how certain patterns are implemented as a way to empower the charity to take ownership and change their own content after GiveCamp. For Example: how do they modify the content on a page, add a blog post, add a new event.
Custom Dev
This is a wide range and deep subject. There may be a developer environment setup script, or all tools may be provided on a virtual machine. Custom development may be in .Net or Java, in or out of the cloud, with or without a database, and may or may not include automated support like unit testing. Most likely source control systems are used as well as a build and deploy process. This area demands experienced individuals with a well-defined process and is typically not something that the charity can maintain after the GiveCamp Weekend is over.
When it’s over
Your PM will be putting together a presentation of your team’s work. NOTE: Do take before and after photos and screenshots (if applicable) of your work (i.e. site updates, etc.…). Consider asking along the way if something you have or have delivered may be worth adding to the presentation. Your Monday after GiveCamp could be a drastic change. Consider trying to schedule downtime Sunday night to easy back into the real world.
Jedi Tips
The GiveCamp Wordpress Distro
The distro contains the following
- The latest version of wordpress
- The latest version of divi
- A child theme for divi. Use this as your theme, and make any code changes (php/css) here
- Some files to make wordpress run better
- .htaccess - Config file for Apache More Info
- .user.ini - Config file for PHP More Info
- phpinfo.txt - used for testing php. To use, change the file extension from .txt to .php and then view the page in your browser. It will report back info about your php configuration. NOTE: change it back to .txt when done as to not share your php configuration with bad people.
- web.config - Config file for IIS
- Some commonly used plugins
- akismet - anti spam plugin
- bloom - Email opt-in
- monarch - socail share and follow
- wp-mail-smtp - send email from wordpress using O365/Gmail
Dev Tools
Browser
I like Google Chrome or the Microsoft Edge Dev Channel for editing/testing WordPress & Divi sites. Typically when I am working on WordPress & Divi sites I will open 2 instances of my browser. A normal instance where I log in to actually make the changes and an InPrivate/Incognito instance where I view the site as a normal users.
FTP
My favorite FTP tool is FileZilla. However after the initial setup of my WordPress & Divi site I typically only have to use FTP if I am making changes to my child theme.
Code Editor
Typically the only “code” changes I am making are edits to my child theme. I typically use VS Code for this.
Running WordPress Locally
A local instance of Wordpress is good for testing plugins and learning. However, most of the work you will do for the charity will be adding content to the production website and a local install will not be needed.
To run WordPress locally you will need some core services: a webserver (Apache), a database server (MySQL) and the PHP runtime. The good thing is that there are folks that have packaged all of them up into one easy install.
- Check for WAMP Server Prerequisites
- Install WAMP Server
NOTE: If you need something outside the usual, you can find a full List of WAMP installers and other stuff here
- Download the GiveCamp Distro of WordPress from Slack (look in the Tech Jedi channel)
- Ensure the WAMP icon is green
NOTE: you will have to restart WAMP after you reboot your computer, You should have a WAMP icon in your start menu. (Wampserver64)
- Setup the Database
- Go to http://localhost
- Select PhpMyAdmin from the tools box
- It will prompt you for a login
- Username:
root - Password:
<blank>
- Username:
- Select the “user accounts” tab at the top of the screen
- Select “add user account”
- Set a username, I typically use the same name that I used for my project
- Set the hostname to “local”
- Create a password
- Check the box for “Create database with same name and grant all privileges.”
- Leve the rest of the defaults, and press the “go” button at the bottom of the screen.
- You should see the new database in the tree of databases on the left hand side of the PhpMyAdmin screen
- Deploy Wordpress PHP files
- Open your www home (by default C:\wamp64\www)
- You can find it by clicking on the wamp icon in the tool tray and selecting the “www directory” option
- Copy the GiveCamp Distro of Wordpress into the folder
- Rename the folder from wordpress to whatever you want to call your dev site
- No spaces, underscores, or special characters
- Open browser to http://localhost
- You should see the folder you just created listed under “Your Projects”
- Click “Add VirtualHost” under tools
- Give your new VirtualHost a name, I use the same name I gave the folder earlier
- Enter the path to the folder
- Press the “Start Creation” button
- Restart WAMP DNS
- Right click on icon in tool tray
- Select tools, then restart DNS
- Wait a moment till the WAMP icon turns green
- You should now be able to navigate to http://yourfoldername
- Run the wordpress installer
- Select “English” press “continue”
- Press “lets go”
- Enter the database name and password you created in the first step
- NOTE: the database name and the username should be the same value
- NOTE: the values ARE case sensitive
- Leave the database host as “localhost” and the table prefix as “wp_”
- Press “submit”
- If everything is correct you should see a “run the installation”
- Give your site a title, again I usually use the project name
- Create a wordpress username and password
- NOTE: be sure to write this down
- Enter a email address and check the box to “discourage search engine from indexing the site”
- Press “install wordpress”
- You can now login to wordpress
- Activate the “Divi Child” Theme
- In the wordpress admin dashboard
- Go to “Appearance” and then “themes”
- Find the “divi child” theme and select the “Activate” button
Common tasks when building a Wordpress site
Create a home page
Most sites will have a static home page
- In the wordpress admin dashboard
- Go to “pages” then “add new”
- Give your page the title “Home”
- Press the “use divi builder button”
- Add some content (see divi instructions for details on how to do this)
- Press the “publish” button
- Set the page as default
- Go to “Settings” and then “reading”
- Set the radio button to “a static page”
- And then in the homepage drop down select the page you just created
- Save your changes
Working with Menu’s in Wordpress and Divi
Divi Navigation
I typically use the navigation features in Divi. It will look at your pages and automatically generate the menus. The benefit of this technique is that your navigation will match the layout of the pages section in your WordPress admin dashboard.
- Go to “Divi”, “Theme options”, “Navigation”
- More Info
- You can control the page hierarchy using the “Parent” feature and ordering using the “order” feature
-
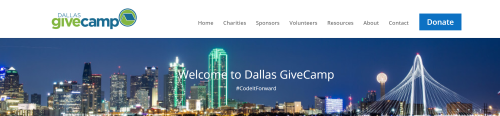
For example on the DallasGiveCamp.org website, we have a “Sponsors” page and underneath it there are pages that list the sponsors for each year.
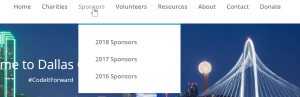
- Use the “order” property to get your pages in the right order from smallest number to largest (i.e. home, charities, sponsors, volunteers …) or (2018 Sponsors, 2017 Sponsors, 2016 Sponsors). TIP: if your number your pages 100, 200, 300 it will leave you space to add something in the middle later (i.e. you can give it an number of 350)
- Use the “parent” property to place one page underneath another
-
I will typically use the “Quick Edit” option to make these changes
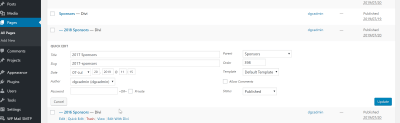
-
Wordpress Navigation
Wordpress also has a built in draggy/droppy way to build menus.
- Go to “Appearance”, “Menus”
- More Info
To Highlight a page in the Divi Navigation
Many charities want to highlight there “donate” page, like we do.
There are a few ways to do this, this is how we did.
- Create the donate page, you should see a normal entry in the menu.
- Right click on the menu entry, select “inspect” to pull up the HTML DOM.
-
It should jump to the
atag for your page. It should look something like this.<li class="page_item page-item-22"> <a href="https://dallasgivecamp.org/donate/">Donate</a> </li> -
You should see a
page-item-22css class on the element. Your page number will be different than mine. Remember that number. -
Next add this css to the bottom of your Divi-Child/style.css sheet. Be sure to update the page number, and the colors to fit in with your site.
.page-item-22 > a { color: white !important; background-color: #0c71c3; border: none; padding: 15px 20px !important; text-align: center; text-decoration: none; display: inline-block; font-size: 20px; margin: 4px 2px; cursor: pointer; } - Upload the CSS sheet to the Divi-Child folder, and refresh the site to see the changes.
Add Facebook info to your site
Facebook makes a plugin, it is really a bit of html/javascript code that you can add to a code block in Divi, it is not a WordPress plugin. It is a great way to get Facebook timeline, events, and messages onto your site in a few mintues.
Add default GiveCamp footer
- In the wordpress admin dashboard
- Navigate to Appearance, Customize, Footer, Bottom Bar, Edit Footer Credits
-
Enter the following text
© 2019 Charity Name | Site Built at <a href="http://www.DallasGiveCamp.org" target="_blank">Dallas GiveCamp</a> | Hosting Donated by <a href="http://www.everleap.com" target="_blank">Everleap</a>
Making code modifications
Most of the work you will do will be adding content to the production website. However you will need to edit the code if you need to you need to add PHP code to alter the default functionality of wordpress. This is a rare occurrence for GiveCamp projects as we try to use tested and maintained plugins instead of custom code.
You will want to use a local install of wordpress to develop and test your code
Place code in the Divi Child theme or custom plugin, don’t modify the base divi or wordpress core as this will prevent the charity from upgrading the website later on. See info about child themes here
Working with Images
It is a best practice to size and optimize your images PRIOR to uploading them to wordpress. Large image sizes are the number one cause for a slow website.
TIP: I will typically get all the images I need for the site first, then do this process for all of them at once, before I start building the site.
- Crop the image (if needed)
- Resize the image
- Step by Step instructions here
- Typically I use 3 widths for my pictures.
- 1000 px for images that will be displayed the full width of my page
- 500 px for images that will be displayed 50% of my page with
- 300 px for all other images
- I will typically use whatever height keeps the aspect ratio correct. Unless I need multiple images to line up across the page, then I will crop them so that their heights match.
- Save your picture as a PNG file, be sure to give it a good descriptive name.
- TIP: if you need the same photo at different sizes on your site, put the size in the file name (i.e. ShawnHeadshot_300_300.png or ShawnHeadshot_100_100.png)
- Optimize your image, Images contain extra information that bloats there size, there are many services that allow you to upload your images to remove extra bloat. This is done without loosing any quality. I use TinyPNG. Using the service is simple, upload your image, they will optimize it and give you a download.
Moving to a new domain
** Make a backup before & after you do this ** (see below for instructions)
** Every situation is different, depending on your situation your mileage will vary on if you will be able to follow these instructions step by step or have to tweak them. If you have concerns about this process, please reach out to the Tech Ninja and get a second pair of eyes. **
Many times, we will develop the websites for our charities using the temporary domain name provided by the hosting company, and only after we get approval from our charities, do we do the DNS swing to the new domain.
Before you start, do the following:
- Get your domain name:
- If you don’t have a domain name yet the charity will need to purchase one from a registrar like GoDaddy.
- If the charity is currently using the domain name on another host, you will need to get the charities approval to do the transfer. It is best to wait till the new site is done, as to not publicize a site that is not done. Moreover, you need to be super carful when making DNS changes, as you could break other critical services on the charities domain, like email.
- Choose where you want your DNS to live. You have a few choices, below is my decision tree.
- If you want to use Cloudflare, they will be your DNS (See below)
- By default, your registrar will likely offer DNS as a free service, if so you can use this.
- If your registrar doesn’t offer this feature, you can use Everleap’s name servers.
When you are ready to do the transfer:
- Update Everleap
- Set the domain name (i.e. yourcharity.org) in Everleap. You will find this setting in the “General Information” section of the “Site Overview” page in the Everleap control panel.
- Write down the IP Address of your web server.
- Update your DNS
- Now, update your DNS settings to map your domain name to point to your IP Address. Typically, you will need to do this for 2 “A” records. The primary (i.e. yourcharity.org) and the one for the www subdomain (i.e. www.yourchairty.org).
- Update WordPress
- Go to your site using the secondary URL and log into WordPress (i.e. http://1234-123.el-alt.com/wp-admin)
- Under settings/general in the WordPress admin you will need to update the “WordPress Address (URL)” and the “Site Address (URL)”. You will change this to “http://mycharity.org”
- This will trigger WordPress to log you out.
- You will now need to wait for the DNS to propagate, this could take up to 48 hours.
- Once the DNS has propagated, then you will be able to log back into WordPress.
- Now you will need to replace any references in the site to point to the new domain name. I like the Better Search Replace plugin by Delicious Brains to do this.
- After you install it you will see a menu entry under “tools”.
- In the search for box type the full URL (i.e. http://1234-123.el-alt.com), in the replace with box type the full URL (i.e. http://mycharity.org)
- After you are done you can deactivate and delete the plugin.
Cloudflare
Cloudflare is a web proxy. It sits between your host and your users. It provides features like caching (to improve site performance), free SSL certificates (to improve security and search rankings), and firewalls (to block/challenge unexpected groups of bad users). We have had good luck with Cloudflare, and they offer a free tier.
NOTE: these instructions are new, consider them BETA and please provide feedback
NOTE: Setting up Cloudflare requires DNS changes. This process takes time, and nobody will be able to use the site while the changes are being made. Typically you do it as part of moving to a new domain (see moving to a new domain above).
The general process is as follows
- Sign up for a free Cloudflare account.
- During the registration process, they will attempt to migrate over your current DNS settings. During this process you can update the A records as outlined in the update your DNS part of the moving to a new domain section above.
- On the SSL/TLS tab in Cloudflare, update the setting to “Full”
- On the Caching tab in Cloudflare, change the “browser cache expiration” value to 1 year.
- Now update your WordPress settings as outlined in the Update WordPress part of the moving to a new domain section above. NOTE: you will need to use “https://mycharity.org” not “http://mycharity.org”
- Configure Page rules to protect the wp-login.php and xmlrpc.php pages see details here
Send email from Wordpress
- You will need a 3rd party email provider like O365 or Gmail
- Go to the “plugins”, “installed plugins” page
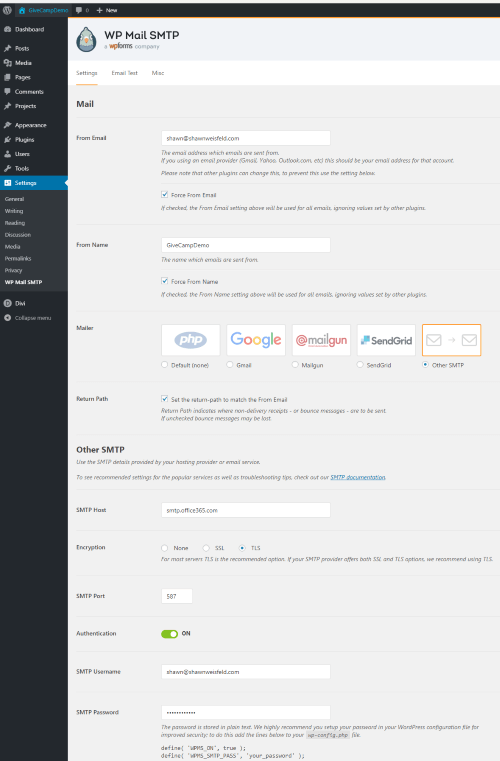
- Activate the WP Mail SMTP plugin
- You should have a new entry for “WP Mail SMTP” under “settings” menu option
-
How you will configure this depends on what email provider you are using. Here are my settings for O365
Wordpress Backup
- There are many backup plugins, I have not have had great luck with these.
- It is a best practice to make backups during regular intervals during the GiveCamp weekend. It is required that you take a backup at the end of the GiveCamp weekend.
- Wordpress consists of 2 components, you will need to backup both components.
- The Files: this includes the PHP, HTML, CSS, JS, images and other content that sits on the file system of the webserver
- The Data: this includes everything stored in MySQL
- You can backup this stuff by hand using an FTP tool (i.e. FileZilla) and MySQL Workbench, or we have created an automated backup tool that you can download here.
Tip: Dallas GiveCamp can provide automated backups for charities using Everleap/WordPress that opt-in. Contact your Tech Jedi for details.
Helpful Links/Tools
- Divi Documentation
- Sucuri Scanner - Free website security check & malware scanner
- WebPageTest - Test a website’s performance
- MX Toolbox - lookup information about DNS server, hosting, email, etc.
- How to Easily Create a Multilingual WordPress Site
Plugin Reviews
- Membership
- Gravity Forms The Gravity Forms plugin paired with wp-mail-smtp can help fill gaps for advanced contact or volunteer form requirements. It features storing form submissions in the wordpress database, customizing dynamic content for auto-responder and admin notification emails, and features an exhaustive list of plugin-extensions that integrate with several CRMs, payment processors, webhooks, etc. Never store sensitive PII in wordpress .
- Yoast SEO Yoast is definitively -the- wordpress SEO plugin. Your divi theme comes with some SEO functionality out of the box. Yoast has over 5 million active installs, and has more robust features than a theme can alone: individual page meta information management, facebook share image and text management, global site seo meta settings, and convenient warnings for when you do silly things - like forget to turn the robots noindex meta tag off. It also makes content management suggestions for making your site more indexible over time. The free version nearly always meets all of a non-profit’s needs.
On this page:
- Suggested Pre-Event Timeline
- Getting Yourself Ready
- Working with the Charity
- Working with your Team
- Working the Weekend
- Working with the Technology
- Tech Details
- When it’s over
- Jedi Tips
- Common tasks when building a Wordpress site